| |
| HOME |
| About Tenaya |
| About Us |
| Latest Update |
| Logs from Current Year |
| Logs from Previous Years |
| Katie's View |
| Route Map |
| Links |
| Contact Us |
![]()
Equipment Repairs, Replacements, Upgrades & Comments:
Fireboy Automatic fire extinguisher system
Selden In-Mast Electric Furling
Yanmar engine coolant shut-off valves
"Haul out/storage on the hard" To Do list.
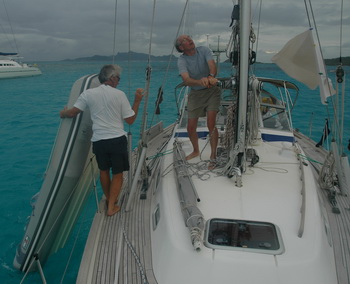
Selecting a dingy and motor was a major decision. There are so many choices and people have different opinions. In the Netherlands most people had the rollable, stowable kind with 4 or 6 horsepower motors. These are fine if you never go very far, but we had hopes that we would use ours for exploring and diving. For longer distances a RIB (Rigid Inflatable) is nice but it must be stored on deck. One strong recommendation came from SAIL AWAY! by Paul and Sheryl Shard (a good book and their DVDs for sailing and travel are very enjoyable). Paul tries to be objective about the choices, but says "I should mention that we are so happy with our Avon R310 and Yamaha 8HP motor that it might be hard to make objective comparisons to other choices". We choose the same model of tender and motor. This decision was later confirmed by John Neal of Mahina who believes a RIB, with its speed and capacity outweighs the hassle of having it always on deck.
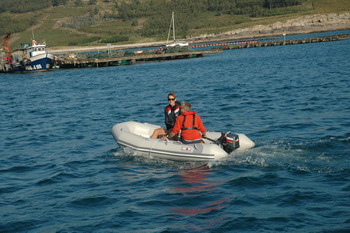

Currently (August 2007) we are in Northwest Spain and have used the tender for exploring the beaches and rivers of the Spanish Rias. It was a great choice! We carry it on deck, using the spinnaker halyard and winch to lift it over the lifelines and onto the deck. With a little practice this has become quick and easy. The motor is stored on the pushpit and a block and tackle system mounted on the radar pole makes lifting the motor easy. An added benefit is that we can open the forward hatches and have some airflow even when it is raining as they are covered by the dinghy. Downside - no easy escape for guests using that cabin and it stops us from using the front hatch to bring up the spinnaker.
Update March 2009. We are currently in the Caribbean and still think this is the best choice for a dinghy. Often we are anchored a mile or two away from the town and having a fast dinghy makes it an easy trip.
Update May 2013. In Australia. Still love it. Dinghy started filling with water so we replaced the plug a couple of times and finally figured it out. Water was seeping through holes in the hull from dragging it up on beaches. We really don't want wheels! Anyway, now we patch with fiberglass from time to time.


The stern of the dinghy is tied with lines around the teak handrails. Lines from the mast hold it from moving forward.
The bow is tied to a shackle on the attachment point for our cutter stay.
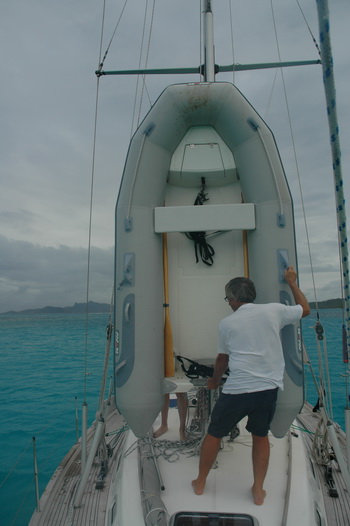
We use the cutter halyard to lift the dinghy on deck.
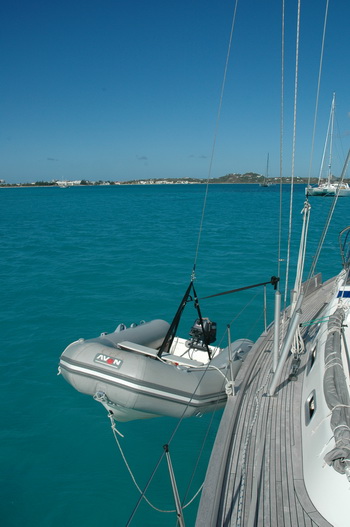
When we are in an anchorage each night we will lift our dinghy out of the water. This helps keep it clean and maybe it will not be stolen as easily.
Many marinas offer WiFi but often the signal is very weak. In 2007 we added a Radio Labs Marine WiFi antenna It screws onto a normal marine mount fitting (I leave the fitting permanently attached) and the wire can come through a window if the weather is good or through the cockpit hatch when it is raining. The wire is 15 feet long and plugs into a USB port. The manufacturer claims 15x more power than your laptop. I can get WiFi connections when others have been unable. I think it's a great deal at $170.
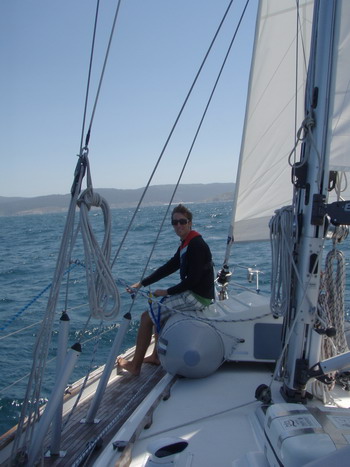
When sailing with the wind coming from behind and the mainsail is out as far as it can go to one side, a shift in wind or a wave can easily catch the mainsail and swing it to the other side causing an accidental gybe. This is very dangerous and can cause major damage to the rigging. A line is tied to the end of the boom and then to the bow to help prevent this.
Our preventer set-up is a combination of designs used on Mahina and Hawk (Beth Leonard and Evan Starzinger) and some excellent suggestions from other sailors. The goal is to have a preventer that is easy to set up and easy to use when the seas are rough.
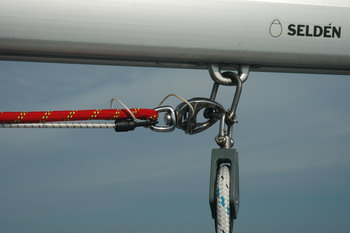

A line is hooked to the end of the boom (it is important to attach this line to the very end of the boom as a forward connection can cause damage to the boom in an accidental gybe) and then held forward near the boom vang. Ours has only a spliced end, no ring or hook, to make it a little quieter when it bangs against the boom. The goal is to have the end within easy reach when the boom is already completely out to one side. It is attached to a length of bungee, running through a block, so that when the preventer is released it will return to the center of the boat within easy reach. Then the the preventer can be moved to the other side or stowed.
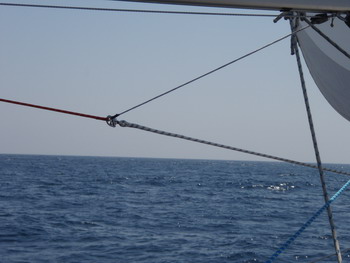
The preventer line is attached to the short line on the boom (the red line) with a shackle and then run forward to a bow cleat.
Then, using Mahina's method, the preventer is run to a bow cleat (John runs it through the cleat, we are using a block) and then back to a rear cleat. Then when the preventer needs to be tightened or loosened it can be done from the stern, a better place to be in big waves and strong winds.
When we gybe (on purpose) first we release the preventer from the stern cleat, then gybe. The preventer line then needs to be moved from one side of the boat to the other (and outside all rigging). With this set up it can all be done while standing near the mast. Once changed the preventer can be tighten and secured on the stern cleat.
Someone suggested having another block at the stern cleat and the preventer line brought forward to a rope clutch within reach of the cockpit, which sounds like a good idea. So far this has worked fine though. Hawk uses a similar system, but they have 2 preventer lines and 2 lines mounted on the boom that allow them to gybe without changing the preventer. After a number of gybes as we zigzagged south along Portugal with the wind directly behind I think maybe we will add an additional preventer line that can remain attached. This would allow us to only release the one preventer at the stern, gybe and tighten the other one, without even going to the mast.
Update May 2008: I added a second preventer line so now we can gybe back and forth with only going to the stern, releasing one side and tightening in the other. We have used this system now on 2 overnight sails when the wind was directly astern and think it's the answer.
Update October 2008: When sailing wing-n-wing we fix the spinnaker pole on one side, using the unused preventer as the forward line and another shorter line from the end of the pole to the mid cleat.
After using this setup for 8 years I think it is the best, at least for our style of short handed sailing.
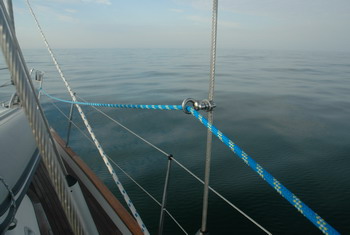
Originally we used the more common jack lines for safety. They were webbing the attached at the bow and stern and ran along the deck. When we needed to get out of the cockpit, either in rough conditions or at night, we would clip on a safety tether from our harness to the jack line, securing ourselves in case we fell overboard (not a good thought, but at least we would stay with the boat). Besides in bad weather, we both use safety tethers whenever only one of us is on watch and the other sleeping. We have 2 pad eyes mounted in the cockpit.
When we sailed the west coast of Norway on Mahina they used high lifelines and we really liked how convenient they were. From my many years of mountaineering and rock climbing using safety lines comes natural. For Katie, on the other hand, it was a different story. She swims well, is not afraid of going in the water and would rather move about unencumbered. These lines had to be easy for her to buy into the idea. For the lifelines we use 9 mm line, attached to the bow pulpit (a bowline tied at that end, then the line run through it), run through a fitting at the shroud and back to the stern pushpit. We tie a trucker's hitch and then half hitches. Our lines are too long requiring multiple half-hitches to secure the extra line. Another small project...
The strength of the Hallberg Rassy bow pulpit and stern pushpit make these safe connection points. On some boats they may not be strong enough to be used as an anchor.
The fitting on the shroud was a challenge. Mahina uses a special cleat, an Aladdin Cleat, that is made for attaching to a shroud. They are made by a company in Southern California (www.moonlitemarine.com) and Katie was able to buy 2 when she was there in June. They did not fit. They were made for shrouds up to 8 mm and Tenaya's are 10 mm. Somehow Amanda had modified them to work on Mahina but I'm not as smart as she. Using a cable clamp and a round fitting I created my own.
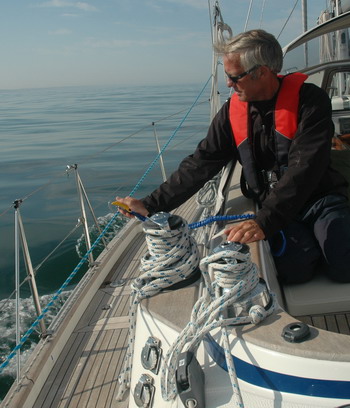
When it's time to leave the cockpit the high lifeline is within easy reach (OK, it doesn't look like really rough and dangerous conditions, but it was a perfect day to finally take pictures of our lifelines and the preventer).
Lifeline Update - September 2008. Now we are back to using jacklines on the deck. While the use of high lifelines have their advantages, on our size boat they were often in the way when we needed to go forward, especially when sailing downwind. They wove between preventer lines, shrouds, sheets and the self-steering lines. We find it more convenient now, as we are sailing downwind in the Atlantic, to have the lifelines along the deck.
May 2013. Using high lifelines again as we haven't been doing as much downwind sailing.
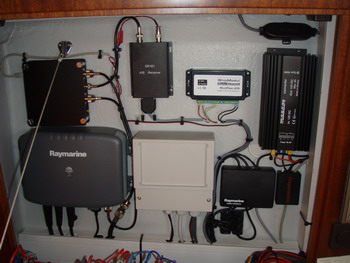
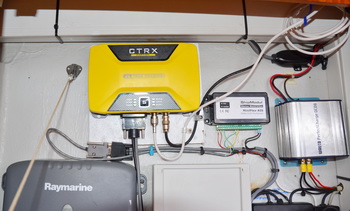
We had AIS installed in April, 2007. The upper center box is the Smart Radio SR 161 AIS receiver, the horizontal box to the right is a ShipModul Marine Electronics MiniPlex-AIS NMEA-0183 Multiplexer. The upper box on the left is antenna splitter, allowing the AIS to use the same mast top antenna as the VHF. There is some loss by using a splitter, but I decided it was a reasonable trade off to being able to use the mast top antenna. The box directly below the splitter is the VHF. If you look closely you can see where the mast top antenna has been unconnected from the VHF and then directed to the splitter. If there is ever a problem with the splitter it is easy to unscrew the one wire and re-attach the antenna directly to the VHF.
AIS is really a wonderful invention. Large ships are required to have AIS transmitters so it is easy to spot them on AIS often before the RADAR picks them up and then be able to see their name, direction, speed, MMSI number and other information. Often when you see a large ship in the distance it is hard to know which way it is traveling and whether it is a danger. AIS makes this easy. One time, in the Bay of Biscay, we picked up a large tanker that was coming directly towards us. Katie used the ship's name from the AIS and called him on Channel 16 to see if they saw us. They had seen us and even changed their course some to miss us by more than a mile.
AIS does not replace RADAR! Only ships above 300 tons are required to have it and often it is the fishing boats and smaller ships that are a bigger risk near the coast, so RADAR is still the best at seeing what is around you.
We have seen one sail boat with an AIS transmitter. As the costs come down I am sure more small boats will add the transmitter, but it seems this may just add more clutter to a screen. Already, in the Straits of Gibraltar the screen is filled with AIS targets.
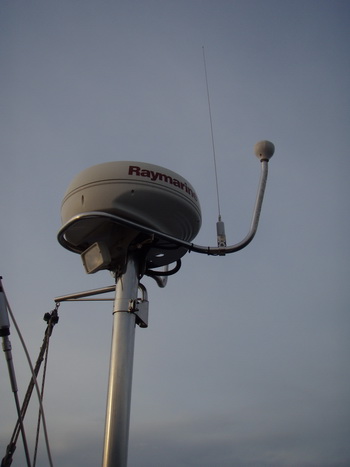
One change I made in 2008 was adding a VHF antenna on the RADAR pole for exclusive use of the AIS and eliminate the splitter box. It can also be an emergency VHF antenna for the radio.
In April 2011 while we were in Gulf Harbour, Auckland, New Zealand we upgraded our AIS to a Class B transponder. Now not only will be able to see AIS signals from other ships but we will appear on their screens too. This also allows anyone to track our progress, using one of the free marine tracking websites.
The only time we have had an issue was in Singapore, with the number of AIS targets (maybe 1000?) overpowered our system and shut down not only the AIS but the chart plotter too. We switched to the iPad (see below) backup until I figured out the problem.
See Manual for Class B Transponder
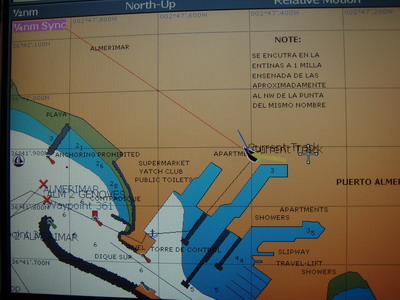
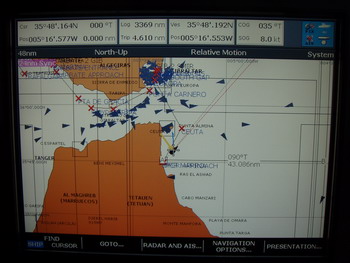
Every book on navigation warns readers about the short comings of GPS. Using a chart plotter and GPS is wonderful and it's very easy to start to believe it and trust it completely. While GPS does give an exact position on the earth, the charts are not always that accurate. Many charts were drawn more than a hundred years ago and even charts that are fairly new don't always match the GPS position. Almerimar marina is a new marina in one of the most popular cruising areas in the world so you would expect the chart to match the GPS position. In the above picture you can see that if we had followed only the chart plotter (and this is very common) we would have hit the rocks before we reached the current position in the middle of apartment blocks. The best book I've found to help understand the shortcomings of charts and GPS is Nigel Calder's How to Read a Nautical Chart.
We also carry paper charts. Many people rely only on their chart plotter and electronic charts. Normally that works fine and the costs of paper charts are very high. Usually people will talk about the reliability of GPS and the fact they have back up GPS receivers. But the bigger risk is to the electronic chart. We had one self destruct (OK, maybe not self destruct since I probably removed it without first following the menu steps for chart removal), but we lost our electronic charts of the area we were sailing and while the GPS still worked without a paper chart this does not help much. I know at least one person who has a backup electronic chart (Navionics in the chart plotter and C-Map on his computer).
2012 - Have added an iPad with Navionics (iNavX App) and C-Map charts as a back-up. Price for e-charts are about 10-15% of what they are for the chartplotter.
2016 Update - Today we have both the iPad back up and a iPhone with the installed charts.
Google Earth is another resource that we used in some of the uncharted or poorly charted areas in Papua New Guinea and Chesterfield Reef. Looking at the reefs in Google Earth when planning allows finding waypoints that are correct even when the charts are wrong. Since Google Earth requires an internet connection it is best to make these route plans before leaving the dock. If you do want to take the Google images with you there are programs that let you download them. I use the program "Harvester" and while it takes a while to download even a small area at high resolution it does this automatically.
I have talked with cruisers who use the Google images on their computer, with GPS showing thier position. I think this is a great idea, but have never done it.
Gori 3-Blade Folding Propeller
The Gori 3-blade is folded, as pictured below, when under sail offering a minimum drag configuration. When the propeller starts to turn under power, water pressure develops immediately on the exposed portion of the blade. The water pressure determines if the blades open to the right or to the left... the propeller opens one way when turning clockwise and the other way when turning counterclockwise. The face of each blade has one pitch and the back of each blade has a higher pitch.
When the vessel is put into forward, the propeller opens so that the face of each blade is the positive pressure side. The water pressure pushing on the blade face pushes the vessel forward. When the vessel is put into neutral before putting the vessel in reverse, the blades fold immediately under the current caused by the forward motion of the vessel. In reverse, the propeller rotates in the opposite direction, flipping the blades over. The water pressure is again pushing on the blade face and pulls the vessel in reverse.
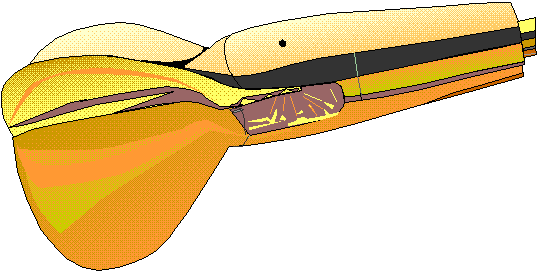
When under sail in favorable conditions, the skipper can decide to motor sail using the back face of the propeller blades, which have a steeper pitch than the front face of the blades. This is accomplished by starting the engine and backing down to put the propeller in the correct orientation. While putting the vessel in neutral, the current keeps the blades open. When the transmission is put into forward, the propeller blades do not flip over, because the positive pressure that develops when the prop starts to turn holds the blades in place. The sails are raised and the vessel is now overdrive, achieving higher speeds for a given RPM, or better fuel economy by running at reduced RPM's at a given speed.
Because the blades are naturally fixed, the vessel will see the same performance under power as with a fixed blade propeller but will have minimum drag under sail. Visit GORI
Video demostration of Gori Propeller
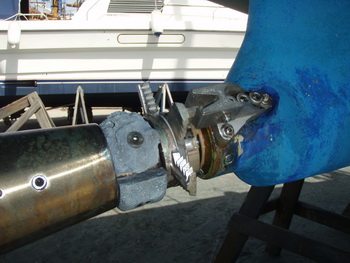
We also have a Rope Cutter installed on the Propeller. It's hard to know if it works. If it does do what it is supposed to, then you never know it. (Note the Anodes. The top one needed replacement. These are not usually in stock in many areas so we now carry extras.)
2016 Update. The rope cutter has worked great a number of times. Unfortunitally the last time was with a 2" (50mm) rope in Papua New Guinea. It did not cut but instead ripped the attachment off the hull.
If you want to hear that story: Video How We Almost Sunk Tenaya in Papua New Guinea
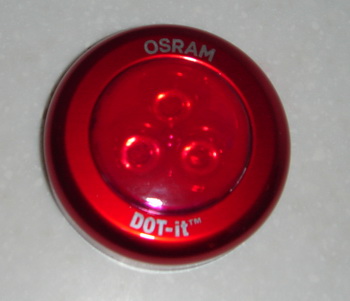
Since we purchased Tenaya new we had to option to add some things that were not on their option price list. We did add a light in the cockpit locker, a door under the chart table, a wire from the radio to the chart table for an iPod, a computer connection for the Raymarine system and a couple of extra outlets. One thing we did not think about was red lights to use at night. I have added a red light on a flexible arm at the navigation table and that works fine, but wiring a red light into the head was a bigger project. Then we found these great little LED lights. For 10 Euro we bought a Dot-It light, painted the lens red with nail polish and then it just sticks with double sided tape above the mirror. The batteries are supposed to last 100 hours. We will probably add one in the galley now.(Update October 2008: we have added 2 in the galley area and another in the forward berth.) Catalog of Dot-It Lights
2014 - I did change the
The removable bow sprit is used with our Asymmetrical Spinnaker.
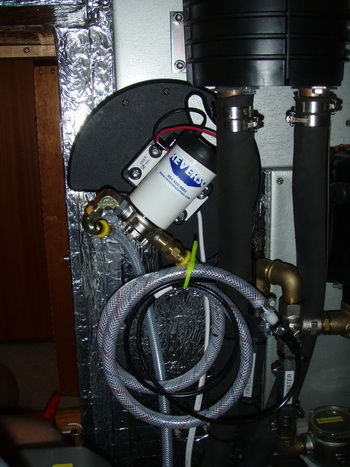
Changing oil with a hand pump is a hard and messy job. A couple of people we respect suggested that we get a Reverso pump so we ordered one while we were in the USA. I mounted it on the engine room wall, with a hose long enough to drain the oil in the engine, transmission and generator. It seems like a great solution...I'll update this after I have used it for a year.
Update: I have now used the pump to change oil in the engine and the gearbox many times and I am glad I made this addition!
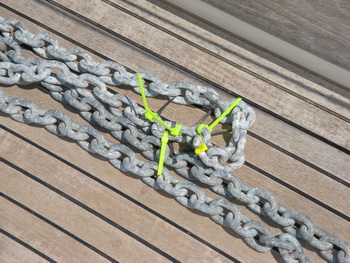
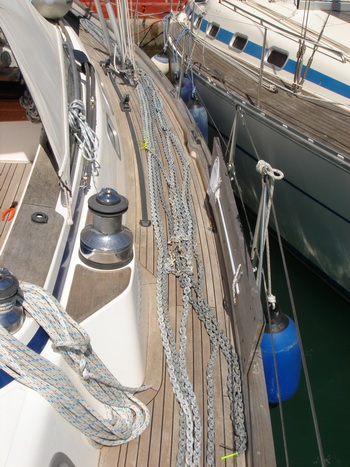
Tenaya has 80 meters (250 feet) of 8mm (5/16") chain. We marked every 10 meters with Zip ties (1 for 10 meters, 2 for 20 meters, three for 30 meters...) and a single one every 5 meters. They lasted perfectly, except we had used black ones and they were hard to see at night, so this year we replaced them with bright yellow ones. Tenaya's chain locker is very large with plenty of room for the chain and 6 fenders. On Pam and Andy Wall's Freya 39 I saw something that we may think about adding. They had a large basket in their chain locker for 300 feet of rope anchor rode for a second anchor. UPDATE: We have 100 meters of rope anchor rode in a large mesh sack in the compartment. We have only used it once, when preparing for a typhoon in Palau.
Update May 2013: Last year we upgraded our chain to 100 meters of 10mm. Still find zipties to be the best markers. When we bent the 25kg Delta Anchor (catching it on an unfriendly fuel dock in Napier, NZ) we upgraded to a 33kg/70lb one. It's a little big on the bow but kind of like hauling around our own mooring.
Update 2016: Having the large anchor and 10mm chain may be overkill, but since we upgraded we have anchored in many conditions and remote locations and the peace of mind that comes with this setup, I think, is worth it.
For a stern anchor Tenaya has a FX-23 Fortress with 35 meters of rode. This is special anchor rode, with the first 5 meters weighted with lead to eliminate the need for chain. Not sure if this works as well as chain, but it is much easier to take out in the dingy. For additional length we add one of our 100 meter lines to the end of the rode.
UPDATE: The special anchor rode had to be replaced from wear. Our new setup is 5 meters of chain and then 50 meters of rode.
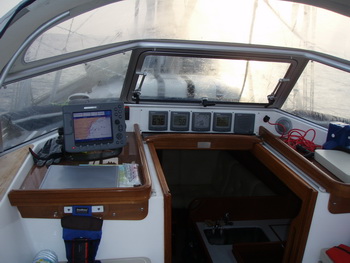
We have two chart plotters. One at the navigation table and one that is under the dodger that can easily be seen from the helm. I really think this works great. You can sit under the dodger, out of the wind and rain to zoom in and out and look at the screen, but also see it from the helm.
Update: I now consider this a requirement! If you need to leave an anchorage at night it is easy to follow the track created on entry and easily find the safe way back out. This only works if the person at the helm can see the track easily. Also, while on watch at night this is the screen we watch for AIS and RADAR targets as well as our direction and position. Other than planning new routes we use the outside plotter more than the one at the navigation table.
May 2013: Added an iPad with Apps for Navionics (iNavX) and C-Map and in sketchy reefy areas we run both and compare. Also use Google Maps and overlay tracks acquired from others that have been where we're going.
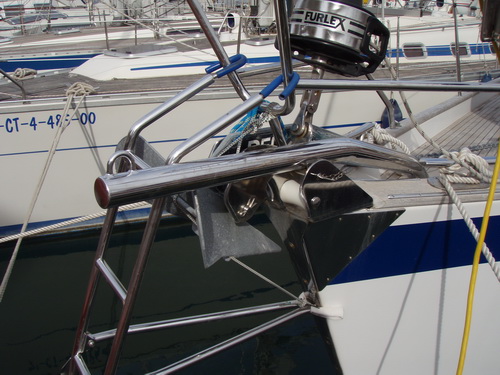
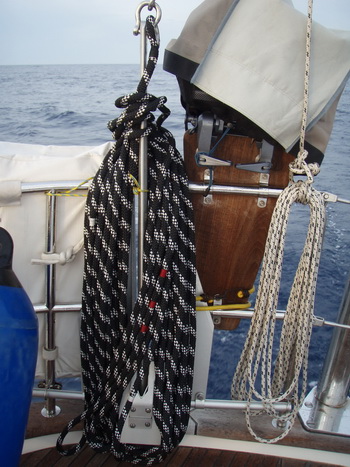
The lead-in line for the SSB needs to be insulated from the back stay. These were made by a shop in Bruinisse, the Netherlands and they work great on the large aluminum tube.
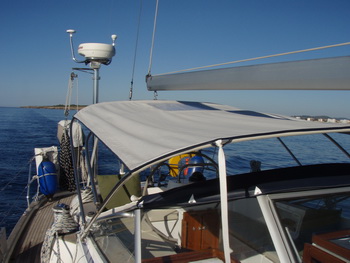
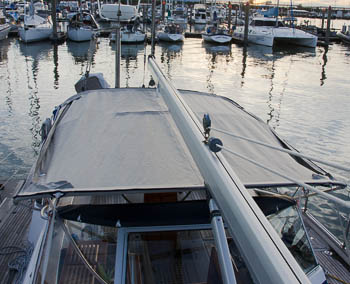
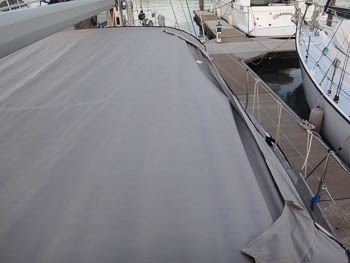
A bimini was one of our last minute additions when we purchased Tenaya and it did not see much use in the Netherlands or the North Sea. But now we are in the Med we love it! It is easy to put up and take down and can be left up when sailing or motoring.
Update: We are now in the Caribbean and use it daily when at anchor.
Update May 2013: Lesson learned - don't use bleach to get rid of mildew spots. It takes away any waterproofness. Jim copied the old bimini design but added rain gutters to each side along with drains and hoses to the water tank. When it rains we tilt the rear of the bimini up a little so the water runs forward, down the drains and into the tank. Works like a charm.

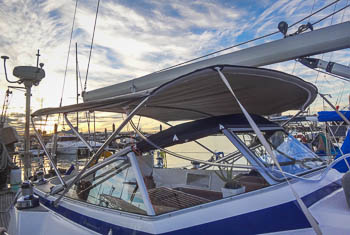
Partial Cockpit Enclosure
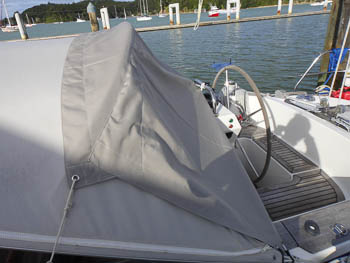
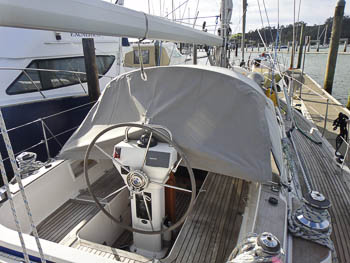
We didn't order the full enclosure that is available from HR but after a few years we wanted some protection from rain coming from behind when doing long passages across the Pacific. We designed and Jim made this thing. Not sure what to call it. It works well to keep the wind and rain off when the on-watch person is nestled up under the dodger next to the chartplotter. We've recently brought back clear plastic to insert a window. Then it will be safe to use coastal sailing as well. It really helped keep the sandflies from coming down the companionway when we were in Fiordland. We just sprayed fly spray and it seemed to do the trick long enough for us to crawl in and out of the boat.
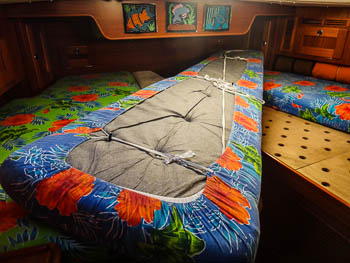
Bedding

Because our mattresses are odd shapes, go all the way to the walls, and cover valuable storage space, we want them to be really easy to deal with. We like having fitted sheets that are well-secured so the mattresses can be tossed around the cabin without worrying about the linens. Jim made these thin, quick-drying sheets from pareau fabric we bought in Tahiti. Depending on the temperature, we use either a flat sheet, fleece blanket or down comforter over us. They are all singles because we both tend to hog the covers. During the day they are folded or rolled and left somewhere at the edges of the beds.
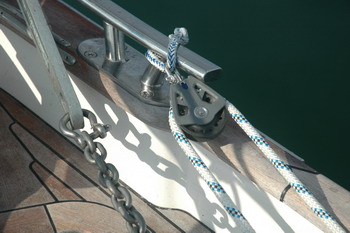
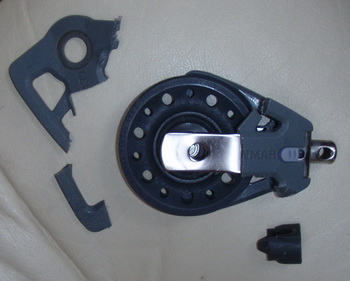
Lewmar rope clutches
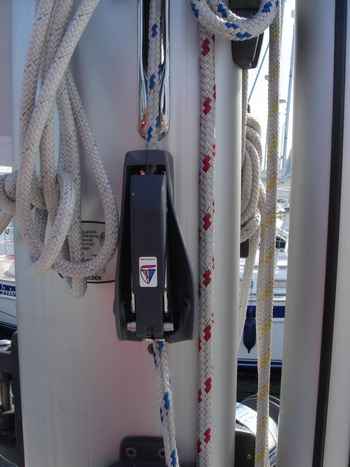
The Lewmar rope clutches work great when the line is pulling directly in line with the housing, but when the line leaves a even a small angle, as it does to our halyard winches on the mast, then it is very weak. We had 3 clutches fail. This was a problem for other Hallberg-Rassy's and they switched to Spinlock. The dealer in the Netherlands replaced the ones on the mast with Spinlock and they have worked fine since then.
Starter Battery
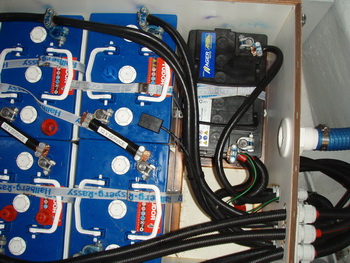
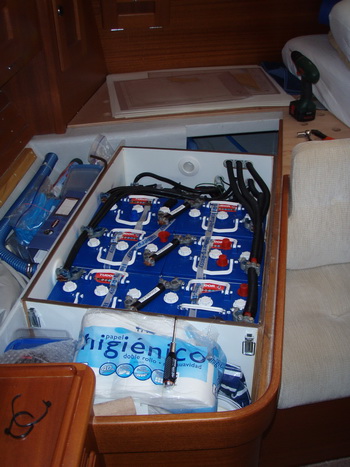
Our starter battery needed to be replaced after 2 years (May 2008). All the other batteries are doing fine. The starter battery is the cheapest one to replace (I paid 85 euros for one a a local Almerimar shop).
This is not really a "failure" but I think normal replacement. The starter battery needed to replace again in May 2011 in New Zealand and then in August 2016 in Italy. Thi last one was 200 euros, but that was delivered to us in the anchorage and the old one taken away.
. Main Sheet Block on Traveler
Not really an equipment failure, but operator error, we blew apart one of the main sheet blocks on the traveler. We were sailing along the Spanish coast with the wind almost directly behind us, so I had a Preventer on the boom. When the wind backed a little I used the electric winch to pull the boom in. But the preventer stopped that and the block was the weak link. Electric winches are wonderful when you are tired, but they do not give you any warning that there is a problem with something.
For an anchor snubber we follow the recommendations of the Dashews. We have 30 feet (9 meters) of 3/8 inch (9mm) 3-strand nylon which we set up with about 2 meters of slack chain. When the wind is blowing above F4 we add a second 8 foot (2.5 meter) snubber with about 2 feet of slack in the chain. In our experience the first snubber will pull tight with winds about 30 knots and then the second one acts as a back up. We have tried knots, regular hooks and the expensive Wilard anchor chain hook. I tried the Wilard after we had the simple (and cheap) hook fall off then the chain became too slack. The Wilard hook does not fall off, but then if there was a problem and we had to get out fast it adds one more problem.

Most people use snubber lines of about the same diameter as their dock lines, so I have always felt that ours was too small (even though the Dashews said it was OK!) and it does stretch and absorb much of the shock of swells.
In Sardinia we were stuck in an anchorage for a couple of days with winds of 25 knots plus and gusts to 35 knots and a good chop. The 9 mm snubber often stretched to it's full length, but never broke.
But the anchor hook bent enough to come off the chain. Our current setup is to use a basic hook for the long snubber (easy to put on and take off. When we set the anchor we use it and since sometimes we will let more chain out to set and then roll it in to the desired scope it's easy to unhook) and the (new) Wilard hook for the back up. Of course, as we get more experience we may change again. We have increased the line size to 12mm and that seems to still have enough stretch but the larger size make us feel better.
After speaking with Beth Leonard and Evans Starzinger (Hawk was anchored near us in English Harbour February 2009) I am going to replace the snubber line with 9 mm climbing rope. This is more elastic at high stresses. Plus I have a lot of old climbing ropes from my mountaineering days!
Update May 2013. Yep, the climbing rope works great. We've been using 10-11mm and hook it on with a galvanized chain hook. We let it out so it goes well into the water, the deeper the longer. Then give the chain some slack. Once the boat is in line with the chain (pulling back from the anchor) we back down and set the anchor. The snubber takes the force rather than the windlass.
I think this is an important step, but we see few people do it. After dropping the anchor and letting out enough scope we let the wind/tide straighten the chain, then we put on the snubber and then we back down on the anchor. We back down slow at first, but then up to 2000 rpms. I have read that this is equal to
While sailing from Guadeloupe to Dominica, about 25 miles, all our instruments went dead. No GPS, speed, depth, wind, etc. Only blank screens.
We have a completely integrated Raymarine system on board and normally it's great, showing the chart on a screen with the location of our boat, heading direction, speed and radar. But because it is an integrated system, when one part went out the entire system went down like the Christmas tree lights when I was a kid.
The system is controlled by a computer housed under the back bunk that is connected to the autopilot and to the instruments. The 5 amp fuse for the SeaTalk system was blown. I replaced it and it worked for a second before burning out again. So there was a short somewhere in the system. I disconnected the autopilot and put another fuse in which quickly blew again. So it seemed the problem was with the string of instruments (speed, depth, wind) and I tested each one with an Ohm meter but found no shorts.
Next I followed the wires to an interface card near the navigation station. Five other wires connected to it, of course none were marked and the Raymarine wiring diagrams did not show them either. With the help of our visiting daughter, Corinne, I disconnected each wire while she watched the multimeter. Again we found no shorts and put it all back together. It worked perfectly so I hoped there had been a short I had not noticed but somehow fixed. We left the next day to sail to Roseau and the instruments worked fine for a couple of hours and then died again.
Again I tried removing one wire at a time and found one that seemed to have a low Ohm reading, possibly a short. I unplugged that wire and replaced the fuse causing the instruments to work perfectly but with no GPS. So that must be the wire from the GPS. I followed it from the panel at the navigation station through the head and into the aft cabin then through the hanging lockers. This was very time consuming since there was a huge bundle of wires all looking the exactly same. Near the back of the cabin I found a connection point where this wire from the Raymarine SeaTalk system attached to the wire from the GPS mounted on the RADAR pole on the stern. It looked fine but closer examination showed a very small hidden section with a small burn mark on the insulation. I had found the short and after repairing the wires everything seems to be working again. January 2010.
Hot Water Tank
Our hotwater tank rusted through after 2 1/2 years. Read about it here.
Mainsail Clew
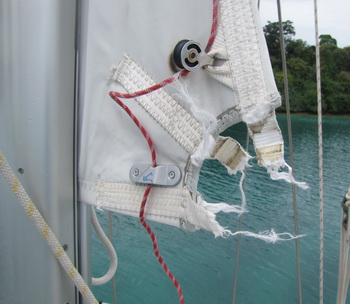

When we were sailing from Tonga to Fiji a squall hit with winds in the low 30's. The clew of our mainsail ripped out. Actually the three pieces of webbing just broke. I had not considered this before, but the clew of our in-mast furling sail is exposed to the sun 100% of the time. Afterwards I heard from another cruiser that the webbing should be replaced every 4-5 years. Lucky for us we were able to return to Tonga and a local sailmaker did a perfect repair job. Now we protect this with a sunbrella cover when we are at anchor or in a marina.
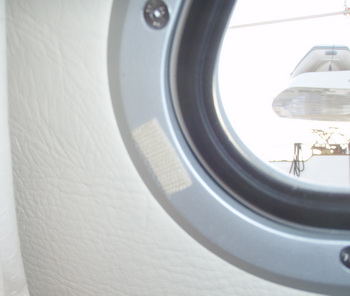
We tried to find a way to put mosquito netting on our hatches. Our ideas included elaborate screens with bungee cords and other involved methods. Then we found a solution that works fine, is very easy to use and takes little storage space. We put small pieces of Velcro Hook on the corners of the hatches and then cut mosquito netting to fit the hatch (we made them oversize and did not worry about an exact). All we have to do is stick the netting to the Velcro and it's done! Very simple and it seems to work fine.
Outboard Engine - Fresh water flush

The manual recommends fresh water flush of the outboard after every use and before storing for a period of time. last year I did it once before winter. This year I found a super easy way to do it, so it will get done more often.
Go to Equipment Comments Page Two
0